 The
easiest way to ensure that this happens is to mount the camera on a focusing
rail, and attach the focusing rail to a tripod. Focusing rails are often sold
with bellows attachments, but can also be bought separately as accessories.
The
easiest way to ensure that this happens is to mount the camera on a focusing
rail, and attach the focusing rail to a tripod. Focusing rails are often sold
with bellows attachments, but can also be bought separately as accessories.
It is important that the two pictures that make your stereo pair must be taken at exactly the same distance from the subject. It also helps if the camera is at the same angle and vertical location relative to the subject.
The
easiest way to ensure that this happens is to mount the camera on a focusing
rail, and attach the focusing rail to a tripod. Focusing rails are often sold
with bellows attachments, but can also be bought separately as accessories.
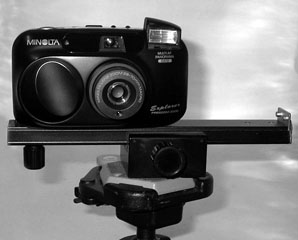
This shows a camera (OK, not a digital one, I used that to take the picture)
mounted on a focusing rail (this particular one came with a bellows attachment
for a Mamiya M645 camera), which is mounted on a ballhead attached to a tripod.
Focusing rails are usually used with the camera pointed along the rail, and
allow you to smoothly move the camera towards and away from the subject for
focusing. If you turn the camera sideways, as here, then you can use the rack
and pinion of the focusing rail to move the camera sideways between the two
shots that make up a stereo pair.
If you are photographing something like a camera, which you'd like to be lit
fairly softly and from several directions as once, but are using a digital point-and-shoot
camera with built in flash, it's really useful to set up for shooting as shown
at the left. The shooting stage is a cardboard box, with the top and sides lined
with aluminum foil, shiny side in. The foils acts as a somewhat diffuse (because
it's wrinkled) reflector, t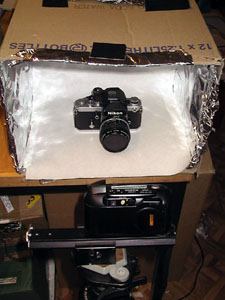 hrowing
light into the harsh shadows created by an on-camera flash. A piece of paper
runs down the rear end of the box and across the floor, acting as a seamless
backdrop
hrowing
light into the harsh shadows created by an on-camera flash. A piece of paper
runs down the rear end of the box and across the floor, acting as a seamless
backdrop
For cameras and other objects with shiny surfaces, it may be necessary to turn the object so that the flash isn't reflected directly from a shiny surface into the lens of the camera you are taking the picture with. Once you have things set up, just take two pictures, one with the focusing rail set so that the camera is a bit to the left of center, and the next with the rail set so it is a bit to the right. It may seem that you'd want to move the camera about 50-60 mm between exposures, since that's about the distance between most people's eyes. For closeups that's usually too much. You will probably want to experiment a bit. I find that about 25-35 mm works best for closeups like photos of 35mm cameras. Too much separation will exaggerate the depth of the picture, and may cause too much color fringing at the edges or on small details in the final composite picture.
If you don't have a focusing rail, you can probably manage but it will be more difficult. You could just carefully move your tripod from side to side between images, for instance. Trying with a handheld camera is less likely to work, as it is very hard to keep the camera-to-subject distance, and thus the magnification, constant. If the magnification changes more than a tiny bit, you won't be able to make the final composite image, as you will see on the next page.
Now that you have a potential stereo pair of photos, what happens next? To see, continue to the next page.
return to first "how-to stereo" page
All images and text on this site are copyrighted by Ross A. Alford and may not be reproduced without permission